Woodcarving: Trinity Celtic Knot Relief Carving
Start by downloading and printing the carving template for the Celtic trinity knot.
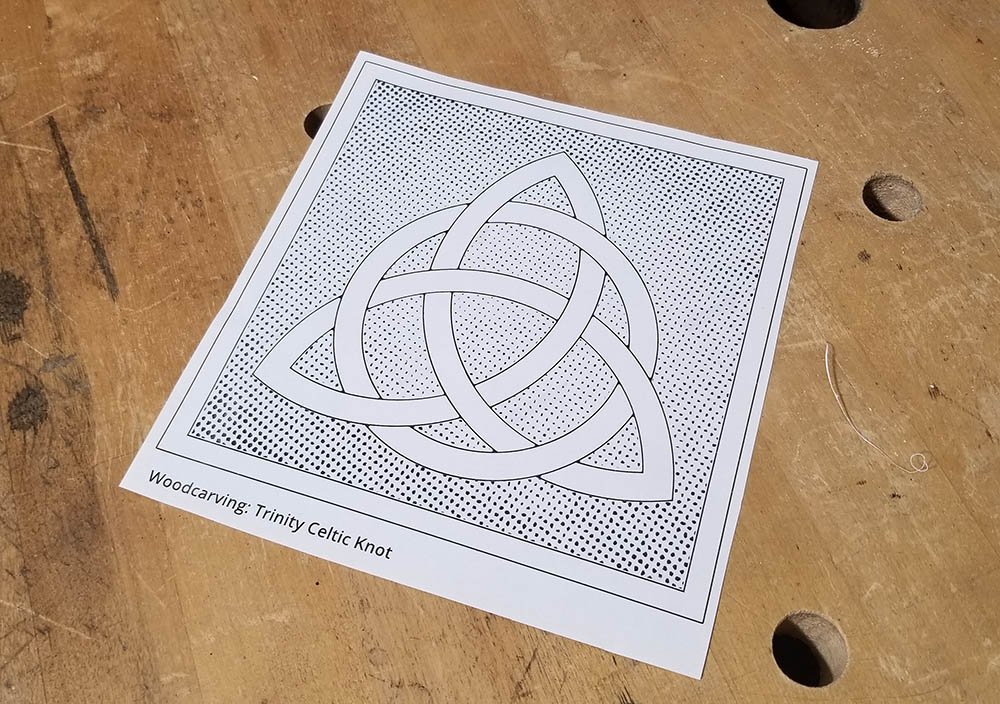
Celtic knot template cut out
Cut away any excess paper, leaving the sides straight.
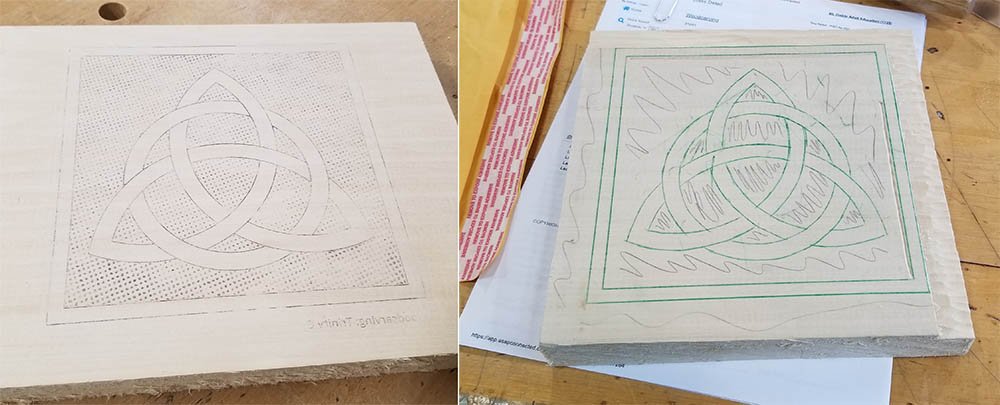
Carving pattern transferred onto wood
Transfer the design to your piece of 1″-thick bass wood, using carbon paper or a solvent transfer technique to get the toner into the wood. For both of the methods, you need to tape the design to the wood on one side, so it can be flipped up and down like a hinge to check on the transfer without shifting the location of the design.
Be aware that doing a solvent transfer will mirror the image.
How to do an acetone transfer

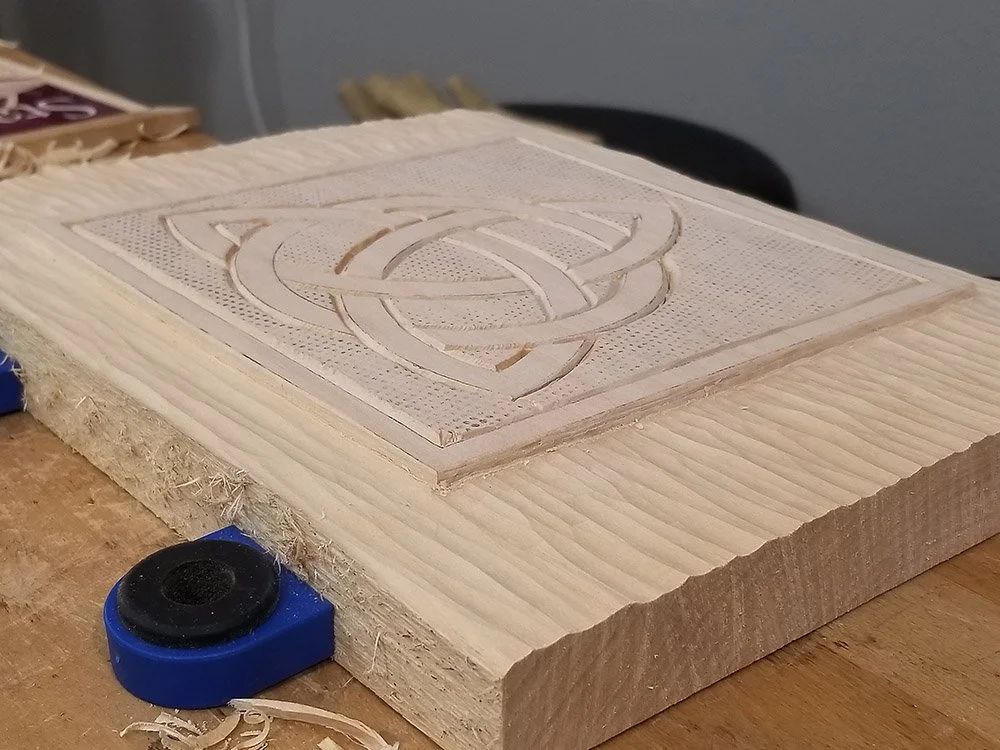
Lines cut out with V-tool
Using a V-tool for carving, cut on the waste side of all your lines. The goal is to keep your lines intact while carving just on the outside of them. The waste areas are designated by the dots.
This is best done with the workpiece secured to the bench either with clamps or bench dogs, and using a push cut with both hands, rather than using a mallet.

Do a stop cut around the outside of the square border.
This is done by placing a straight-edged chisel or carving tool into the V-groove, with the bevel towards the waste section, and hitting it with the mallet.
Remove the waste with a gouge.
Place a gouge outside the stop cut, with the bevel facing down, and cut towards the stop cut with the gouge at roughly 30°.
The desired depth for this cut it 3/16″, and it should take two or three cuts to achieve that depth. Do not make the stop cut deeper than the amount of material you will remove.

Depth cut all the way around the square
This is what it should look like with the stop cut made to full depth all the way around.

Removing the outside area with a gouge
Begin removing the area outside the border with a gouge, keeping all your cuts parallel with the grain.
Make sure to cut in the direction of the grain when possible. If you can see or feel the cutting tool lifting up and splitting the wood fibers instead of cutting them, flip your piece around and cut from the other direction.

Mark the outside of the whole board to establish a depth
Mark the outside of your board on all sides with a line 3/16″ from the face of the board. Use this line as a reference on the next step to ensure your cuts have a consistent depth.

Remove the rest of the outside
On two of the sides, your cuts should be going long-wise. This is what the outside border should look line when it is finished.
Detail of border texture
This part won’t get sanded, so make your cuts very deliberately to create the texture you want to see on the final product.

Stop cut around outside of the Celtic knot
Do a stop cut and remove material around the outside of the knot shape. These stop cuts should be made with a rounded gouge with a wide sweep. Ideally this gouge should have the same curve as the curve on the design. If you don’t have a gouge that matches the same curve, use one with a wider curve. The important part is to avoid cutting into your design.
This stop cut should also remove 3/16″ of material, and require two or three passes, like the previous cuts on the outside of the border.

Removing the inside area
Do a stop cut on the inside of the square border, in the same fashion as the cut you made on the outside of the square border. This should get to a 3/16″ depth, and it should take 2 or three passes.
Be very careful when doing these cuts on the inside of the border. Especially on the short grain sides, the border will be fragile because it is doesn’t have material behind it.

Removing the inside background
Then use your gouges to remove all of the material outside the knot to a depth of 3/16″. As you go along, aim at the high ridges to flatten them out, and go over the whole area with your flattest gouges or chisels to smooth out the area. This will eventually be sanded flat, but the smoother and flatter you can get it with cutting tools, the less sanding you will need to do.
Clean up the outside edges of the knot using the V-tool, and making sure to always work with the grain.

Removing the areas inside the knot
Start removing the inside areas.
Beginning with the largest sections, make a stop cut inside your V-cut lines all the way around each section. This can be done with a gouge that matches the curves, with a chip carving knife, or with a pocket knife (be very careful with this one).

Using a gouge towards the stop cuts
Remove the inside area by push cutting from the middle towards the stop cuts using a heavily curved gouge, like the lower right section in the photo.

Start carving out the small sections
Carefully carve out the small sections, using a similar technique to how you carved out the larger sections, but be more careful.

Clean up the edges
Clean up the edges of the inside sections using a small V-tool.

Smooth out the overlaps
On the areas that overlap, do a stop cut 2/3 of the way down (1/8″) and then carve a transition down to that depth. The goal is to create a gradual ramp on the overlapping parts.

Sanding detailer sticks
Get some sanding detailer sticks for sanding the carving. Another option is to fold pieces of cardboard into sharp corners, but these sanding detailers are much easier to use. You can purchase them on Amazon here: https://amzn.to/34hsg8R

Sand the background and then the knot
Sand the background area, the knot, the ring, and the square border starting at 120 grit and work up to 320 grit. The goal is to hide the tool marks and make it look smooth. You can start at 80 grit if you need to do a lot of reshaping.
Finishing

Raise the grain with water
Dip an artist brush in water and use it to wet all of the sanded areas, re-wetting the brush as needed. This should wet the whole carving except for the textured outside border.
Once the water has dried, the grains should be standing up and the carving will feel prickly. Sand down all those areas lightly with 320 grit to smooth them out.
Raising wood grain with water

Polycrylic and Denatured Alcohol
Using the finish of your choice, seal the whole workpiece. This can be shellac, sanding sealer, or polyurethane. I like to use water-based polycrilic and mix in denatured alcohol to thin it out. I don’t measure the mixture, I just stir in small amounts of alcohol until the mixture drips freely from my stirring stick.
Oil-based finishes will slightly yellow the wood, so use water-based if you want to keep it the same color.
Always stir your clear finishes instead of shaking them, as shaking can create bubbles.
Another option I like to use for sealing is use spray shellac, because it is very thin, being alcohol-based.
The sealant coat will likely raise the grain again, so once it is dry you should rub those areas with 0000 steel wool to knock off the raised grains.
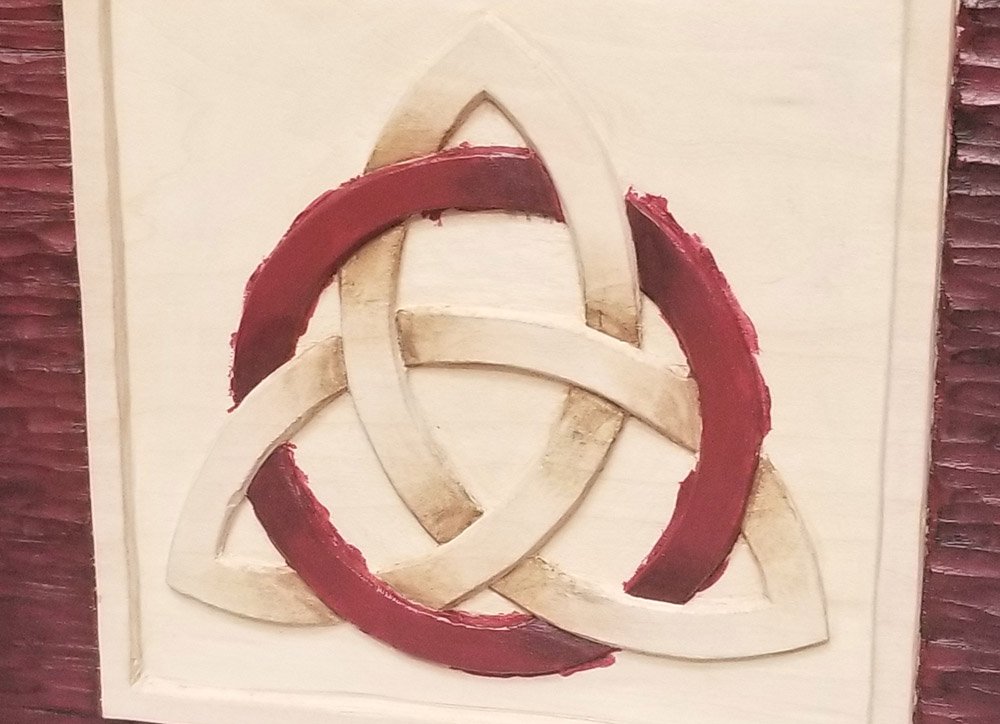
Painting
Painting is optional. If you like the look of the natural wood color, then just protect it with a finish and leave it as-is.

First coat of paint on border and ring
Paint the outside border the color of your choice. I mixed a few different acrylic paints to achieve the red color I wanted. If you are using artist acrylics from tubes, you should mix in some water to thin them out.
I applied masking tape around the square border to keep the paint off of it.
Paint the ring with the same color you painted the outside border. If you mixed a custom color, make sure to mix extra. You can save extra paint in a tiny sealed container so it doesn’t dry out.
When painting the ring, make sure not to get any of the paint on the knot, which will remain unpainted. It is okay to get some paint on the flat background area, because this will be painted at the end.

Second coat of paint on border and ring
Paint a second layer on the border and the ring to get a rich color with no wood showing through.

Painting the border with a wash coat
Optional: once the outside border is dry (acrylic paint dries quickly), apply a wash to the outside border. You can make a wash by taking one or two drops of black paint and mixing in drops of water until it is very thin. Brush the wash over the whole border area. It should naturally flow into the low spots. Use a clean dry brush to dab areas that have too much wash, and it will absorb the water.

Wash coat dried
It should look like this once the wash has dried.

Wash coat as shading on the ring
Apply this same wash to the parts of the ring where it is being overlapped by the knot, being careful not to get any on the knot. When adding this shading, dab off much of the wash onto a paper towel, so the brush is not very wet.
The goal here is to add depth to the overlaps. This is best done with two or three coats to increase the darkness closest to the overlapping part and feather it to a lighter shadow as you go farther from the overlap.
Brown wash coat to shade the knot
For more depth on the knot overlaps, make a brown-colored wash (like the previous step, but using brown paint instead of black), and get some of that wash on a small artist’s brush. Dab the brush onto a paper towel so it is mostly dry, and brush that wash on the parts where the knot overlaps. This is best done in three steps, letting it dry completely between applications.

Sand through the ridges on the border
Use some 320 grit sandpaper to lightly sand the ridges of the border, sanding through the paint and revealing wood color.
If you are using Black 3.0 for your background, you should seal the entire piece at this point with another layer of thinned polyurethane. That paint should be applied last, to maintain its super matte finish.
If you are using regular paint for the background, you can paint the background and then seal the whole piece.
Painting the background

Start painting the background
Paint the large area of the background first using the color of your choice. I used Black 3.0 for its super dark and matte finish. This paint is quite thick, so it will need to be watered down a little bit to spread easily.
Be careful not to get the background paint onto the square border, the knot, or the ring. If any paint gets on the border or the knot (the wood-colored parts), let it dry and then carefully carve that paint off using a small V-tool. If the background color gets onto the ring, let it dry and then paint over those parts using the color of the ring.
After painting the large background area, paint the smaller areas with the same color. This is more difficult, so it is good to practice with the large area.
That’s it! Happy carving!